CRM developers and even end users know of the asynchronous service in CRM; the service is usually associated with workflow processes or plugins. An often forgotten feature is its ability to notify a service endpoint with the data context of the particular CRM message that it is registered on.
The data context contains all of the business data that is processed as part of the CRM message. So if you were to create a contact with first name and last name, the data context would contain that data as well as any other default data as part of the create itself. Things like a newly created contact ID, the created by system user ID, any option sets that had a default value, and a lot more. It is the same data context that you work with when building a plugin so it also will contain your input parameters, pre and post images, the execution depth, the entity logical name, and what CRM message is being executed (create, update, delete, etc.). I have posted a sample contact create data context in JSON here so you can get an idea of all the data it contains as well as its format.
So why would you want to send this to a service endpoint like the Azure Service Bus? Often the CRM asynchronous service is over taxed; it is responsible for so much in the CRM system now. If we can offload some of that logic processing elsewhere then we can improve the overall performance of the CRM system. You need to have the right use case for using the service endpoint though, and choosing which type of Azure Service Bus to send it to will also depend on what your use case is. Over the next few blog posts I will explore some of the use cases I have and are looking to use the service bus with, items like near real-time integrations, ADXStudio cache invalidations, search indexes, and more.
Previously using the Azure Service Bus was more complex as the integration relied on the old (now deprecated) Azure ACS functionality. You had to weave through a number of steps to get it all setup and it was prone to errors. With Dynamics CRM 2016 Spring Update this process has become extremely easy with the support for the modern authentication, Shared Access Signatures (SAS). Also with this release support has now been added for all of the Azure Service Bus types; Queues, Topics and now Event Hubs. Another improvement is you can have the message format of the data context sent in XML and also now JSON. Using JSON will cut the message size in nearly half from the same XML message.
MSDN has provided a walkthrough with the classic Azure portal using a queue. Below I have outlined the process in using the new Azure portal as Service Bus management has recently launched in preview to create an Event Hubs Namespace, Event Hub, then Register it with CRM and validate everything works with Service Bus Explorer.
Setup Azure Event Hub Namespace and Event Hub in the New Azure Portal
- Navigate to the new Azure portal and sign in with your subscription administrator account.
- From the side navigation, select New and search for “Event Hubs”.
- Select the Event Hub result and create a new Event Hub Namespace.
For just testing you can select the basic pricing tier but for production use it would be suggested to go with the standard tier. It would also be advised that you try and locate your Event Hub in the same data center region as the your CRM online organization. If you are an on premise user then likely the closest physical region to your CRM.

- Once the Event Hub Namespace is created and deployed, we still need to create the actual Event Hub. To do so Open The Event Hub Namespace and select Event Hubs from the settings blade.
- From the new blade that lists all the Event Hubs in the namespace at the top click “Add New Event Hub”.
- Give it a name, and for the purposes of the demo leave all the other defaults. See the Event Hub Overview documentation for more information about the settings. You will use the name you assign it when registering the Event Hub.
- Now we need a key and connection string for the namespace. From the settings blade select Shared Access Policies.

- Here you can either select the existing root key, or better yet create a new CRM key. When creating a new key ensure you select the Send and Listen claims to be enabled.
- In the policy settings blade copy and save the “Connection String Primary Key” as we will then use this to register the service endpoint.
Register the out of box CRM-Azure Plugin with an Event Hub Service Endpoint.
Note: The out of box CRM-Azure plugin is preferred if you want to just send entire messages to the service bus. This plugin executes in full trust mode vs. custom CRM-Azure plugins which executes in partial trust mode. To learn more see Write a custom Azure-aware plugin.
- If you do not have the 8.1 (2016 Spring Update) SDK then download it here.
- Within the extracted SDK browse to “ToolsPlugin Registration” and run PluginRegistration.exe.
- Create a new connection to your CRM organization.
- Once connected, to register your Event Hub select Register, Register New Service Endpoint.

- In the dialog select the “Let’s start with the connection string…” and paste in the “Connection String Primary Key” we saved from the Azure Portal Event Hub Shared Access Policies. Select Next.
- On the Service Endpoint Registration, select the Designation Type as Event Hub and enter the Event Hub name you created previously. Setting User Information Sent to UserId will include additional claims in the message. Select Save.

- You should now have your new Service Endpoint listed. From here you can start registering steps on different entities and messages of what you want sent to the Event Hub. Let’s setup a demo contact create one. Right click on it and select Register New Step.
- On the Register New Step dialog enter “Create” as the message and “contact” for Primary Entity.
- Change the execution mode to Asynchronous and check the Delete AsyncOperation if StatusCode = Successful. For developments purposes you might leave this cleared so you can see when messages are sent properly. We will be using another tool to listen to the event hub and see successful messages posted.

At this point we have successfully configured the Event Hub using the Azure portal, registered the Event Hub with CRM as a Service Endpoint, and registered a step for on create of contacts. To help us validate if this is working successfully we need to view the Event Hub to see what messages are posted. An open source tool from an Microsoft engineer, Paulo Salvatori, Service Bus Explorer provides this function and can downloaded from GitHub (best if you want to modify and contribute), you can also get it from MSDN Code Gallery (best if you just want to run it) which includes a debug version already compiled.
Validate CRM Service Endpoint to Event Hub with Service Bus Explorer
- After you have downloaded and extracted Service Bus Explorer, browse to “C#binDebug” and run ServiceBusExplorer.exe if using the MSDN Code Gallery download, otherwise you will need to compile and run the solution.
- Select File, Connect. Under Service Bus Namespaces select “Enter connection string…”. For this connection you will need the claim Manage on the policy used. So navigate back to the Azure Portal and select the root key or create a new key with Manage claim. Select OK once you have entered your connection string. Any errors in the connection will be shown in the log panel on the bottom.
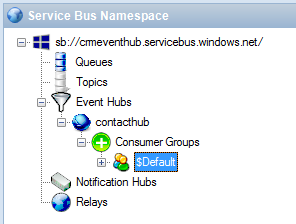
- Once successfully connected, the left navigation should populate with your Event Hub. Expand the Event Hub, and Consumer Groups to expose the default consumer group called, “$Default”. Right click on this consumer group and select Create Consumer Group Listener.
- In the new window for the listener select the Start button. In the log you should see it open a connection to the 2 Event Hub partitions.

- Now navigate to the CRM and create a new contact. Once you have created the contact look back at the Service Bus Explorer listener window. If you have successfully set it up you should see a new log item appear with the message “Event received…”.
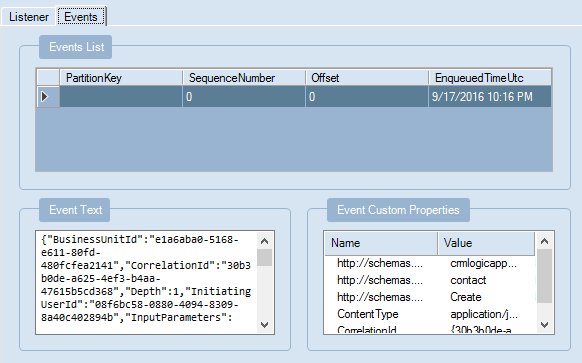
- You can view the entire message by navigating to the Events tab at the top of the window, then select the message from the list and the Event Text is the body of the message with your JSON formatted data context object.
If you did not see your message on the Event Hub then you will want to go in CRM and view the System Jobs log under Settings. From there you should see the failed or cancelled System Event, open it and expand the details to see any error messages.

Hopefully this guide has been helpful. I will be using this as a step in future posts to implement a number of different functionalities.

Hey Colin, superb article and easy to follow – thanks.
Did you get anywhere with using the event hub with cache invalidation of the V8 365 portals ?
I read in lots of places that this is the new mechanism but having searched I can’t find any documentation on how to actually accomplish it !!
A walk through would be most welcome.
Phil
LikeLike
How do i decode the message on a client?
LikeLike
Is there any limitation while integrating CRM with ASB Queue using Logic App.
What will happen if Azure is down and CRM is creating customer continuously . what will happen once Azure is up ?
Will all customer created during downtime , get synchronized to CRM
LikeLike
If Azure is down then the event messages will fail after the retry count and show as failed in the system jobs log. You could use a logic app to initiate a re-processing of failed event messages every 24 hours or have some other reconcilation process to do that. If it was the reverse from another system and CRM was down then the messages would be queued up in the event or queue and processed once CRM came up but that would be logic you would write in the processor of the event hub or queue.
LikeLike